YÊU CẦU
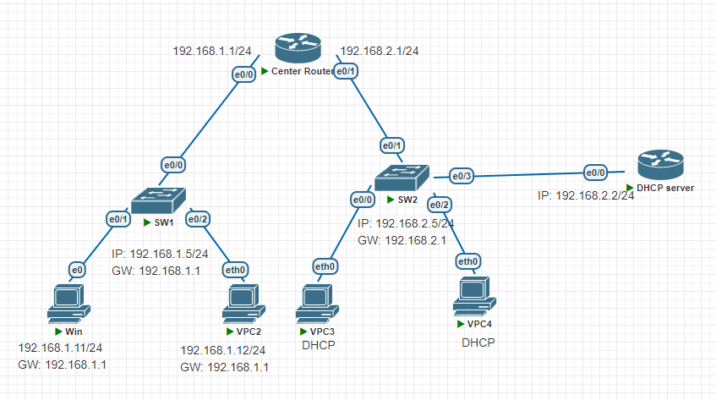
- Sử dụng PnetLab để cấu hình bài Lab bên
- Đặt mật khẩu Console là Cisco, dịch vụ Telnet,Enable Secret cho Center Router,SW1,SW2 là belllab
- Sử dụng lệnh service password-encryption để mã hóa các loại mật khẩu không được mã hóa
- Cấu hình địa chỉ IP như mô hình bên
- Từ các PC thử telnet đến SW1,SW2,Router
- Chuyển sang sử dụng SSH thay cho Telnet trên Router với username: BellLab , password:cisco
- Từ các PC thử ssh đến các router

I, Sử dụng PnetLab để cấu hình bài Lab trên:
Kết nối theo mô hình trên, SW sử dụng image L2-ADVENTERPRISEK9-M-15.2-20150703 và Center Router sử dụng L3-ADVENTERPRISEK9-M-15.4-2T
II. Đặt mật khẩu Console là cisco, dịch vụ Telnet,Enable Secret cho Center Router,SW1,SW2 là belllab:
– Center Router :
Router>enable
Router#configure terminal
Router(config)#hostname CenterRouter
– Đặt mật khẩu cho cổng console
CenterRouter(config)#line console 0
CenterRouter(config-line)#password cisco
CenterRouter(config-line)#login
CenterRouter(config-line)#exit
– Đặt mật khẩu cho dịch vụ Telnet
CenterRouter(config)#line vty 0 4
CenterRouter(config-line)#password belllab
CenterRouter(config-line)#login
CenterRouter(config-line)#exit
– Đặt mật khẩu khi chuyển từ mode User sang Privilege
CenterRouter(config)#enable secrect belllab
*Chú ý : Để đặt mật khẩu chuyển từ mode User sang Privilege ta có thể sử dụng 2 lệnh là enable password và enable secret nhưng mật khẩu của enable secret thì được mã hóa trong cấu hình còn enable password thì không, ta có thể kiểm tra lại điều này bằng cách cấu hình cả đánh cả 2 lệnh này và kiểm tra lại bằng lệnh show running- configure
– SW1:
Switch>enable
Switch#configure terminal
Switch(config)#hostname SW1
– Đặt mật khẩu cho cổng console
SW1(config)#line console 0
SW1(config-line)#password cisco
SW1(config-line)#login
SW1(config-line)#exit
– Đặt mật khẩu cho dịch vụ Telnet
SW1(config)#line vty 0 4
SW1(config-line)#password belllab
SW1(config-line)#login
SW1(config-line)#exit
– Đặt mật khẩu khi chuyển từ mode User sang Privilege
SW1(config)#enable secrect belllab
-SW2:
Switch>enable
Switch#configure terminal
Switch(config)#hostname SW2
– Đặt mật khẩu cho cổng console
SW2(config)#line console 0
SW2(config-line)#password cisco
SW2(config-line)#login
SW2(config-line)#exit
– Đặt mật khẩu cho dịch vụ Telnet
SW2(config)#line vty 0 4
SW2(config-line)#password belllab
SW2(config-line)#login
SW2(config-line)#exit
– Đặt mật khẩu khi chuyển từ mode User sang Privilege
SW2(config)#enable secrect belllab
III. Sử dụng lệnh service password-encryption để mã hóa các loại mật khẩu không được mã hóa :
– Sử dụng lệnh show running-configure để xem lại thông tin các mật khẩu hiện tại
– Để mã hóa các mật khẩu không được mã hóa mặc định, ta có thể sử dụng lệnh service password-encryption để chuyển sang Type-7 password. Lần lượt trên Center Router, SW1, SW2 di chuyển sang mode config và nhập lệnh service password-encryption
CenterRouter(configure)# service password-encryption
SW1(configure)# service password-encryption
SW2(configure)# service password-encryption
– Sử dụng lại lệnh show running-configure và so sánh tình trạng các mật khẩu so với trước lúc đánh lệnh:
line con 0
password 7 110A1016141D
logging synchronous
login
line aux 0
line vty 0 4
password 7 0823494205150415
login
transport input none
!
!
End
*Chú ý : Mật khẩu mã hóa bởi service password-encryption vẫn có thể bị giải mã với các công cụ như:
IV. Cấu hình địa chỉ IP như mô hình trên :
– CenterRouter:
CenterRouter(config)#interface e0/0
CenterRouter (config-if)#ip address 192.168.1.1 255.255.255.0
CenterRouter (config-if)#no shutdown
CenterRouter (config-if)#exit
CenterRouter (config)#interface e0/1
CenterRouter (config-if)#ip address 192.168.2.1 255.255.255.0
CenterRouter (config-if)#no shutdown
CenterRouter (config-if)#exit
– SW1:
SW1(config)#interface vlan 1
SW1(config-if)#ip address 192.168.1.5 255.255.255.0 35
SW1(config-if)#exit
SW1(config)#ip default-gateway 192.168.1.1
– SW2:
SW2(config)#interface vlan 1
SW2(config-if)#ip address 192.168.2.5 255.255.255.0
SW2(config-if)#exit
SW2(config)#ip default-gateway 192.168.2.1
– DHCP:
Router(config)#hostname DHCP
DHCP(config)#interface ge0/0
DHCP(config-if)#ip address 192.168.2.2 255.255.255.0
DHCP(config-if)#no shutdow
V. Cấu hình DHCP:
Bật dịch vụ DHCP trên thiết bị Router cisco, mặc định, dịch vụ DHCP đã được bật.
DHCP(config)#service dhcp
Khai báo DHCP pool, định nghĩa đường mạng của các địa chỉ IP cấp phát cho thiết bị trên mạng LAN.
DHCP(config)#ip dhcp pool MyLAN_Pool
DHCP (dhcp-config)#network 192.168.2.0 255.255.255.0
Khai báo các thông tin bổ sung như: Default gateway, DNS server, lease time với các lệnh bên dưới
DHCP (dhcp-config)# default-router 192.168.2.1
DHCP(dhcp-config)# dns-server 8.8.8.8 4.4.4.4
Loại bỏ các địa chỉ mà MyLAN pool sẽ không cấp phát cho thiết bị trên mạng LAN:
DHCP(config)# ip dhcp excluded-address 192.168.2.1 192.168.2.5
Cấu hình ip cho DHCP:
DHCP(config)#interface e0/0
DHCP(config-if)#ip address 192.168.2.2 255.255.255.0
DHCP(config-if)#no shutdow
Kiểm tra địa chỉ IP đã cấp phát như sau :
DHCP#show ip dhcp binding

VI. Thử telnet đến SW1,SW2,Router :
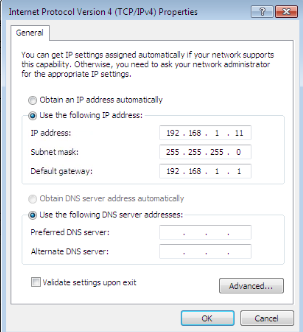
Trên PC chúng ta cấu hình IP như sau:

Từ PC1 tiến hành Telnet đến CenterRouter bằng cách vào Desktop -> Command Prompt
telnet 192.168.1.1
VII. Chuyển sang sử dụng SSH thay cho Telnet trên CenterRouter với username: BellLab , password:cisco:
*Chú ý: Cần phải đổi tên của Router vì trong phiên SSH sẽ dùng hostname của Router và ip domain-name để tạo ra khóa mã hóa cho phiên SSH
– Tạo username và passworld cho CenterRouter dung để chứng thực trong phiên SSH
CenterRouter(config)#username belllab privilege 15 secret cisco
– Cấu hình ip domain-name với tên domain công ty của mình
CenterRouter (config)#ip domain-name belllabacademy.edu.vn
– Tạo ra khóa (key) bằng cách kết hợp hostname và tên domain để tạo ra key mã hóa
CenterRouter (config)#crypto key generate rsa
The name for the keys will be: Centerrouter. belllabacademy.edu.vn
Choose the size of the key modulus in the range of 360 to 2048 for your General Purpose Keys.
Choosing a key modulus greater than 512 may take a few minutes.
How many bits in the modulus [512]: 768
– Key mặc định được tạo ra bởi lệnh này để mã hóa dữ liệu có chiều dài là 512 bit, nếu các bạn sử dụng SSH version2 thì chiều dài key tối thiểu là 768 bit, trong trường hợp này ta sử dụng SSHv2 cho an toàn nên các bạn nhập vào là 768 và Enter
CenterRouter (config)#ip ssh version 2
CenterRouter (config)#line vty 0 4
– Đăng nhập bằng username và password tạo ra ở trên
CenterRouter (config-line)#login local
– Chuyển qua chế độ chứng thực chỉ sử dụng SSH thay cho telnet
CenterRouter (config-line)#transport input ssh
VIII. Từ các PC ssh đến Center Router:
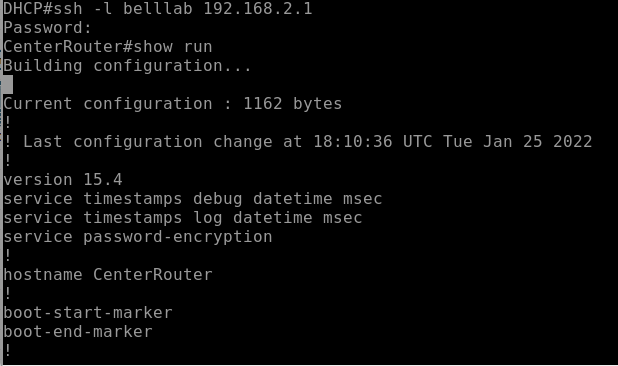
– Để thử SSH từ router DHCP đến CenterRouter trên router DHCP các bạn sử dụng lệnh sau :
ssh –L <tên user> <ip router>
ssh –L TTG 192.168.1.1


 English